Table of Contents
- Integration
- 5 Key Capabilities of Kafka
- Used Stack
- One new NPM Package
- Get Started with a New Kafka Cluster
- Login and create an Upstash Kafka Cluster
- Adding Env-Variables in .env.local
- Fetch Request Details in middleware.ts
- Complete Middleware.ts file
- Startup Dev Environment
- Adding Table to Prisma Schema
- API Route for reading Kafka messages
- API Route for sending data to Postgres
- Calling the endpoint
- Cloudapp-dev, and before you leave us
Upstash Kafka is an ideal solution for website analytics due to its serverless architecture, which eliminates the need to manage infrastructure and reduces operational complexity and costs. Its pay-as-you-go pricing ensures scalability, making it suitable for both small and large-scale applications. Upstash Kafka offers a high throughput and low latency, which is crucial for real-time data processing and analytics.
Integration
Its integration capabilities with various data sources and analytics tools streamline the data pipeline, enabling seamless ingestion, processing, and analysis. Additionally, Upstash Kafka ensures data durability and reliability with its distributed architecture, ensuring that analytics data is consistently available. The ease of use, coupled with robust security features, makes Upstash Kafka a reliable and efficient choice for handling large volumes of website analytics data, providing actionable insights to drive business decisions.
5 Key Capabilities of Kafka
Real-Time Data Processing: Kafka excels in real-time data processing, enabling businesses to perform analytics on live data streams, which is essential for timely insights and decision-making.
Scalability and Fault Tolerance: Kafka’s distributed architecture allows for seamless scalability and robust fault tolerance, ensuring reliable data ingestion and analytics even as data volumes grow.
High Throughput and Low Latency: Kafka is designed for high throughput and low latency, making it ideal for analytics applications that require quick data ingestion and immediate processing.
Integration with Analytics Tools: Kafka integrates seamlessly with various analytics tools and platforms, such as Apache Spark and Apache Flink, enhancing its capabilities for comprehensive data analysis.
Efficient Data Storage and Retrieval: Kafka’s efficient data storage and retrieval mechanisms support large-scale data analytics, enabling organizations to store, access, and analyze massive datasets with ease.
By leveraging these advantages, Kafka empowers businesses to enhance their analytics capabilities, leading to more informed decision-making and improved operational efficiency.
Here is the GitHub repo with the entire code, where you can see all the details regarding my Kafka Integration.
Used Stack
I will start with my default stack:
Next.js 14 as the web framework, and I will use the provided middleware edge function
Upstash Kafka, in combination with the NPM Package @upstash/kafka
Neon.tech Serverless Postgres
Vercel for hosting
One new NPM Package
npm install @upstash/kafkaGet Started with a New Kafka Cluster
Setting up a new Kafka cluster is relatively easy. Login to Upstash:
Login and create an Upstash Kafka Cluster
On the top, select “Kafka” and below on the right, “+ Create Cluster”. Select a Cluster name, a region, and the Replica type, and you are done.
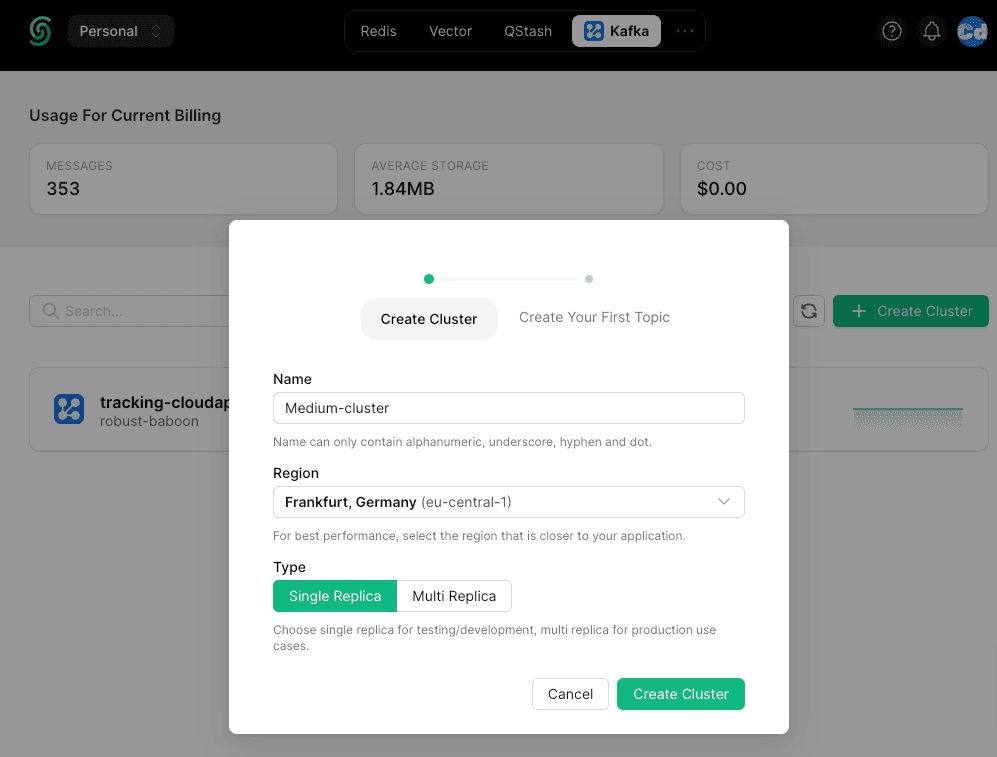
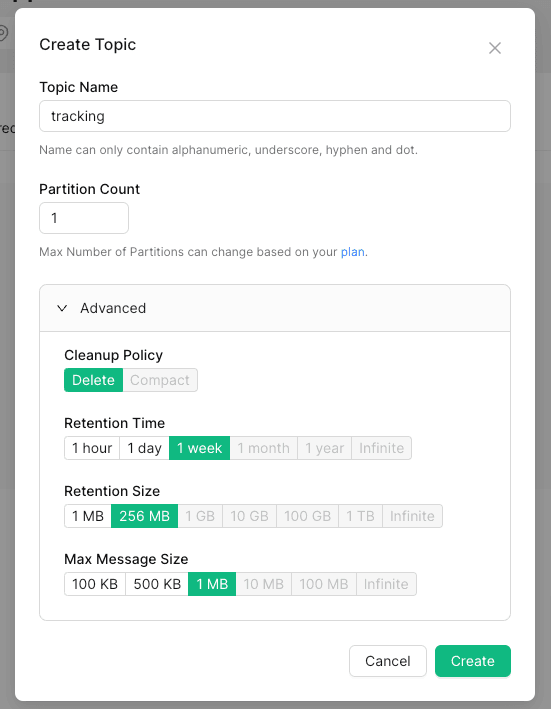
In the second step, create a “Topic,” which is the place where your messages will be stored and where you select the “Cleanup Policy” and the “Retention Settings”.
Getting the needed data for the .env.local
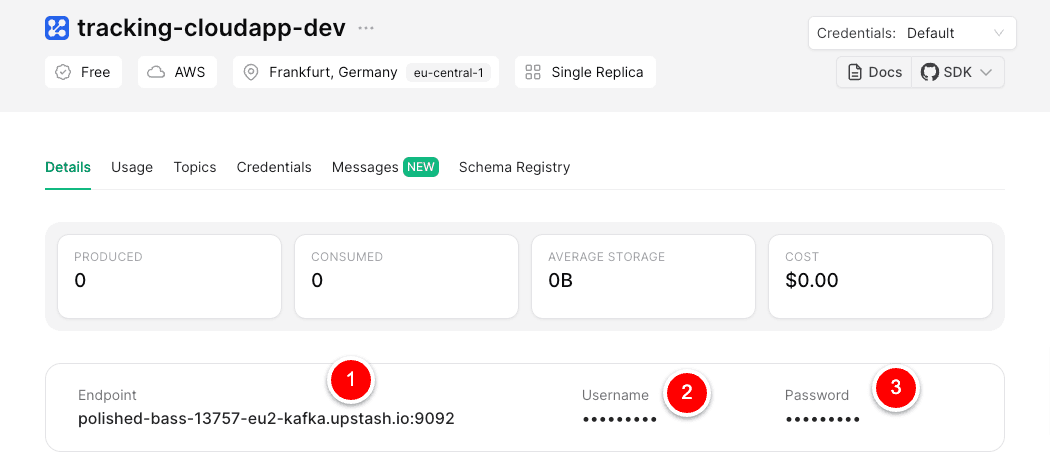
Adding Env-Variables in .env.local
Use the three values copied before for the local .env file
# Upstash Kafka
KAFKA_URL=https://xxx-kafka.upstash.io
KAFKA_USERNAME=xxxx
KAFKA_PASSWORD=xxxx
Fetch Request Details in middleware.ts
As a first step, I import the “Kafka” package into the middleware.ts file under src and add “NextFetchEvent” from next/server as well.
import { Kafka } from "@upstash/kafka";
import type { NextFetchEvent, NextRequest } from "next/server";
Then, I define the connection with the prepared .env variables.
const kafka = new Kafka({
  url: process.env.KAFKA_URL || "",
  username: process.env.KAFKA_USERNAME || "",
  password: process.env.KAFKA_PASSWORD || "",
});
The next step is to add the event to the function definition.
export async function middleware(request: NextRequest, event: NextFetchEvent) Now, I am ready to get the details from the “request” object and push them to our Kafka Cluster. The first part with the const newDate = xx is used to set the “created_at” attribute in the object messagekafka because I need to add two hours (I am living in CET ;-))
Below the creation of the “messagekafka” object, I start the “producer” and define the “topic” (remember the name that you set up in upstash).
On the last line, I push the data to the cluster.
const newDate = new Date();
  newDate.setHours(newDate.getHours() + 2);

  const messagekafka = {
    country: request.geo?.country,
    city: request.geo?.city,
    region: request.geo?.region,
    pathname: request.nextUrl.pathname,
    url: request.url,
    ip: request.headers.get("x-real-ip"),
    exip: request.ip,
    nexturl: request.headers.get("next-url"),
    mobile: request.headers.get("sec-ch-ua-mobile"),
    platform: request.headers.get("sec-ch-ua-platform"),
    useragent: request.headers.get("user-agent"),
    referer: request.headers.get("referer"),
    fetchsite: request.headers.get("sec-fetch-site"),
    created_at: newDate.toISOString(),
  };

  const p = kafka.producer();
  const topic = "tracking";

  event.waitUntil(p.produce(topic, JSON.stringify(messagekafka)));
Complete Middleware.ts file
import { NextResponse } from "next/server";
import type { NextFetchEvent, NextRequest } from "next/server";
import { fallbackLng, locales } from "@/app/i18n/settings";
import { Kafka } from "@upstash/kafka";

const apikey = process.env.API_KEY;

const kafka = new Kafka({
  url: process.env.KAFKA_URL || "",
  username: process.env.KAFKA_USERNAME || "",
  password: process.env.KAFKA_PASSWORD || "",
});

export async function middleware(request: NextRequest, event: NextFetchEvent) {
  //Middleware to track user data
  const newDate = new Date();
  newDate.setHours(newDate.getHours() + 2);

  const messagekafka = {
    country: request.geo?.country,
    city: request.geo?.city,
    region: request.geo?.region,
    pathname: request.nextUrl.pathname,
    url: request.url,
    ip: request.headers.get("x-real-ip"),
    exip: request.ip,
    nexturl: request.headers.get("next-url"),
    mobile: request.headers.get("sec-ch-ua-mobile"),
    platform: request.headers.get("sec-ch-ua-platform"),
    useragent: request.headers.get("user-agent"),
    referer: request.headers.get("referer"),
    fetchsite: request.headers.get("sec-fetch-site"),
    created_at: newDate.toISOString(),
  };

  const p = kafka.producer();
  const topic = "tracking";

  event.waitUntil(p.produce(topic, JSON.stringify(messagekafka)));

  // Check if there is any supported locale in the pathname
  const pathname = request.nextUrl.pathname;

  // Check if the default locale is in the pathname
  if (
    pathname.startsWith(`/${fallbackLng}/`) ||
    pathname === `/${fallbackLng}`
  ) {
    return NextResponse.redirect(
      new URL(
        pathname.replace(
          `/${fallbackLng}`,
          pathname === `/${fallbackLng}` ? "/" : ""
        ),
        request.url
      ),
      301
    );
  }

  // Check if the pathname is missing any locale
  const pathnameIsMissingLocale = locales.every(
    (locale) => !pathname.startsWith(`/${locale}/`) && pathname !== `/${locale}`
  );

  if (pathnameIsMissingLocale) {
    const RewriteUrl = request.nextUrl;
    RewriteUrl.pathname = `/${fallbackLng}${pathname}`;

    return NextResponse.rewrite(new URL(RewriteUrl, request.url));
  }
}

export const config = {
  /*
   * Match all request paths except for the ones starting with:
   * - api (API routes)
   * - _next/static (static files)
   * - _next/image (image optimization files)
   * - favicon.ico (favicon file)
   */
  matcher: [
    "/((?!api|sitemap.xml|robots.txt|_next/static|_next/image|favicons|images|favicon.ico).*)",
  ],
};
Startup Dev Environment
Let’s test it with the command
npm run dev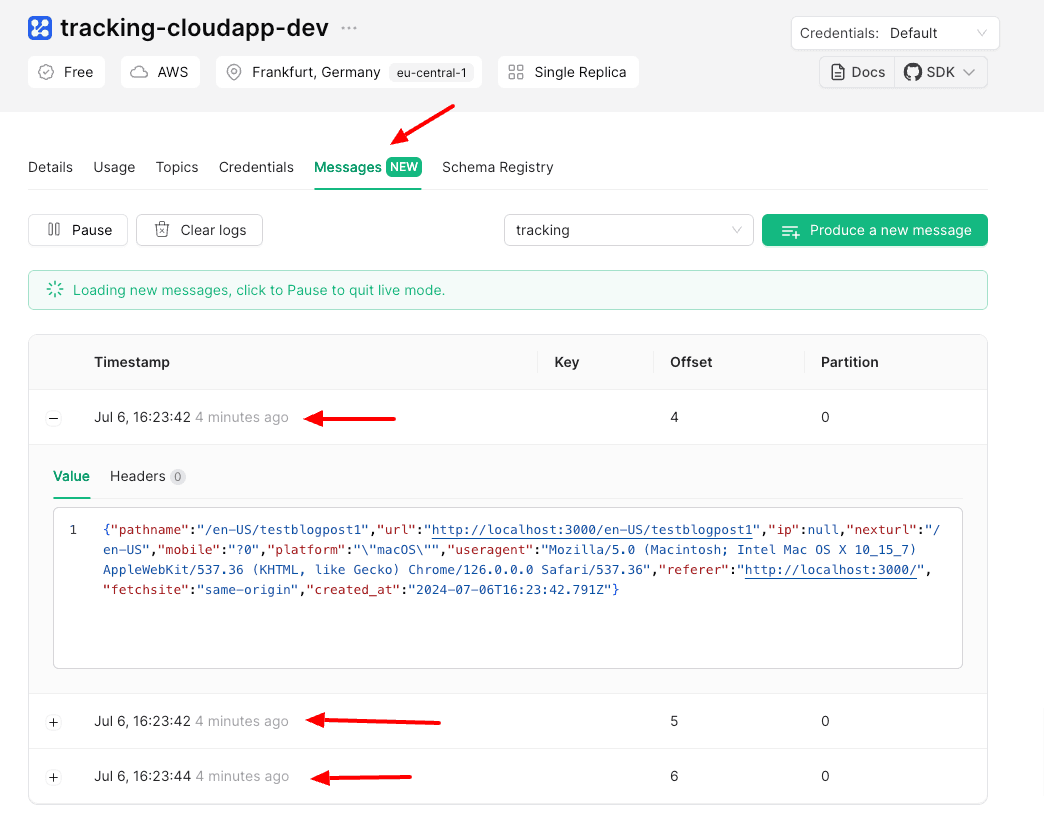
Adding Table to Prisma Schema
The Kafka Connection is up and running. Now, I will create the schema for the new Postgres table in Prisma.
model tracking {
  id         Int       @id @default(autoincrement())
  country    String?
  city       String?
  region     String?
  url        String?
  nexturl    String?
  ip         String?
  pathname   String?
  mobile     String?
  platform   String?
  useragent  String?
  referer    String?
  fetchsite  String?
  created_at DateTime?
  addedOn    DateTime  @default(now())
}
After saving the schema.prisma file under prisma run
npx prisma db pushNow, you should see the table in the DB schema on neon.tech console.
API Route for reading Kafka messages
Now, I am creating a new API Route for my next Project.
import { NextRequest, NextResponse } from "next/server";
import { Kafka } from "@upstash/kafka";
export const dynamic = "force-dynamic";

const apikey = process.env.API_KEY;

const kafka = new Kafka({
  url: process.env.KAFKA_URL || "",
  username: process.env.KAFKA_USERNAME || "",
  password: process.env.KAFKA_PASSWORD || "",
});

async function sendToPrisma(message: any) {
  const response = await fetch(
    `${process.env.NEXT_PUBLIC_BASE_URL}/api/user/tracking`,
    {
      method: "POST",
      body: JSON.stringify(message),
      headers: new Headers({
        "Content-Type": "application/json" || "",
        "x-api-key": apikey || "",
      }),
    }
  );

  const data = await response.json();
  const returnData = data?.data;

  if (response.ok) {
    return NextResponse.json(
      {
        returnData,
      },
      { status: 200 }
    );
  } else {
    return NextResponse.json(
      { error: "Failed to Post Tracking Data" },
      { status: 500 }
    );
  }
}

export async function POST(request: NextRequest) {
  if (request.headers.get("x-api-key") !== apikey) {
    return new NextResponse(
      JSON.stringify({ status: "fail", message: "You are not authorized" }),
      { status: 401 }
    );
  }

  const c = kafka.consumer();

  const messages = await c.consume({
    consumerGroupId: "trackingGroup",
    instanceId: "trackingInstance",
    topics: ["tracking"],
    autoOffsetReset: "earliest",
  });

  messages.forEach(async (message) => {
    const content = message.value;

    const responsePrisma = await sendToPrisma(JSON.parse(content));
    const prismadata = await responsePrisma.json();
    // const prismareturn = prismadata?.returnData;

    // console.log("prismadata", prismareturn);
  });

  if (messages !== null) {
    return NextResponse.json({ messages: messages.length || 0 });
  } else {
    return NextResponse.json(
      { error: "Failed to fetch messages from Kafka Cluster" },
      { status: 500 }
    );
  }
}
Here, we don’t define a Kafka Producer, as we did in the middleware.ts, but we define a Kafka.consumer to read the messages of a topic. For the “consumerGroupID” and “instanceId” you can specify a random name. It’s used for the offset, which means that if there are more consumers, every consumer should have its own “consumerGroupId” so that it can use its own “offset” when fetching the messages.
const c = kafka.consumer();

  const messages = await c.consume({
    consumerGroupId: "trackingGroup",
    instanceId: "trackingInstance",
    topics: ["tracking"],
    autoOffsetReset: "earliest",
  });
API Route for sending data to Postgres
As you probably have seen, I am using the second API Route to send the data to Postgres via Prisma. (src/app/api/user/tracking)
import prisma from "@/lib/prisma";
import { NextResponse } from "next/server";

const apikey = process.env.API_KEY;

export async function POST(req: Request) {
  if (req.headers.get("x-api-key") !== apikey) {
    return new NextResponse(
      JSON.stringify({ status: "fail", message: "You are not authorized" }),
      { status: 401 }
    );
  }

  const {
    country,
    city,
    region,
    pathname,
    url,
    nexturl,
    ip,
    mobile,
    platform,
    useragent,
    referer,
    fetchsite,
    created_at,
  } = await req.json();

  let data = await prisma.tracking.create({
    data: {
      country: country,
      city: city,
      region: region,
      pathname: pathname,
      url: url,
      nexturl: nexturl,
      ip: ip,
      mobile: mobile,
      platform: platform,
      useragent: useragent,
      referer: referer,
      fetchsite: fetchsite,
      created_at: created_at,
    },
  });

  return NextResponse.json({
    data,
  });
}
Calling the endpoint
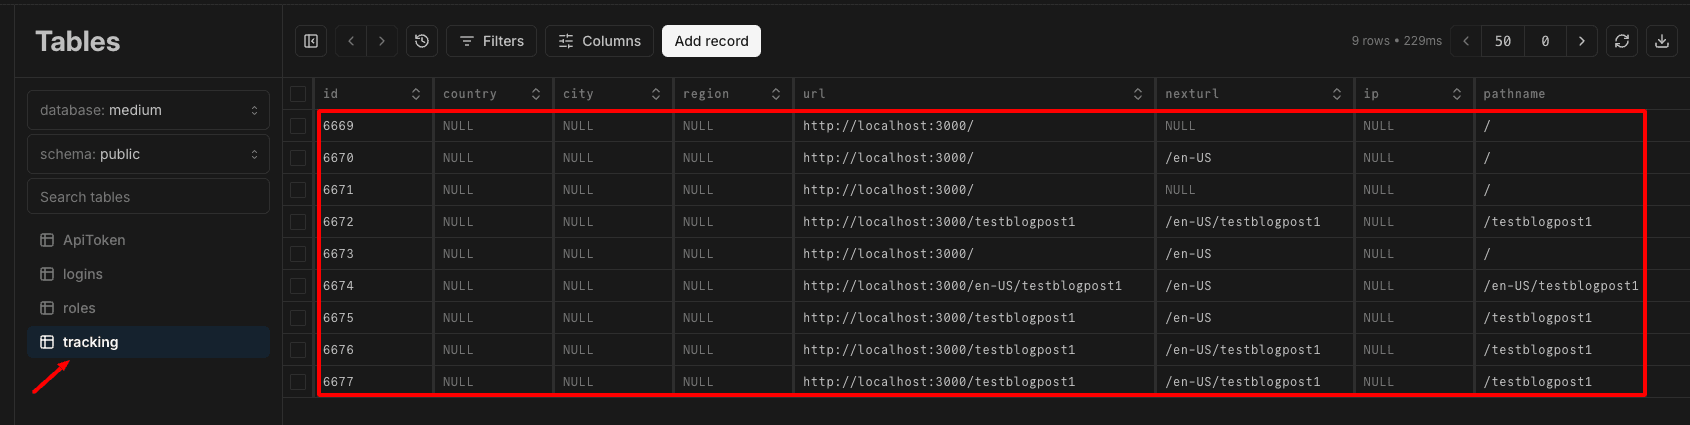
If you now do a POST call to the endpoint:
http://localhost:3000/api/startConsumer
You will get the processed number as response and should see the data in your Postgres Table. Don’t forget to pass the API-Key as header “x-api-key”
In the following stories, we will go ahead and automate the import to Postgres via Vercel Cron and build an Analytics Dashboard step by step.
Cloudapp-dev, and before you leave us
Thank you for reading until the end. Before you go: